How to include a table of contents
If your document has several sections, you will need to include a table of contents to direct the reader to exactly where they need to be. The external report template has a table of contents included which you will need to update once your report is written or you may want to add a table of contents if you’re using the internal report template.
It’s best to update or insert a table of contents once your document is complete with headings throughout.
Add a new table of contents
To add a new table of contents put the cursor where you want it to appear (usually straight after the cover sheet).
Click References tab and select Table of Contents and from the drop-down menu choose Automatic Table 1 or Automatic Table 2. The only difference is the title “Contents” or “Table of Contents.”
The table of contents will display sub-levels. Each level represents a heading level in your document (Headings 1, Heading 2 and Heading 3). Depending on the document you may want to reduce this to just Heading 1. Click Table of contents again and choose Custom Table of Contents option.
In the Table of Contents dialog under General, choose 1 from the Show levels dropdown and then click OK.

Updating the table of contents
If you add, edit or remove a section from your document, you can update the table of contents to match your changes.
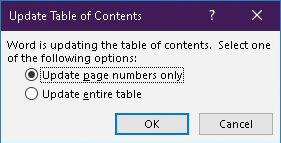
Select the Table of Contents and click Update Table. On the dialog that appears choose whether you want to “Update page numbers only or “Update entire table” and click OK to apply the change.